How to add a contact form to your Shopify website: Step-by-step guide

Building a contact form on your Shopify website is a great way to collect customer data and keep in touch with your customers. In this article, we will walk you through the process of adding a contact form to your Shopify website in 7 steps.
At the end of the tutorial you’ll:
- Have a working contact form on your Shopify Store
- Receive email notifications for each new submission using form backend
- Set-up auto-responses for your form
Table of Contents:
- Introduction
- Create your first form ~30 seconds
- Change your form code on your Shopify Store ~ 2 minutes
- Option 1: Modify the existing form
- Option 2: Add your own form code
- Testing out your form ~ 15 seconds
- Setting up email notifications ~ 20 seconds
- Setting up respondent email notifications ~ 20 seconds
- Conclusion
Introduction
Contact forms are critical for any online store to collect essential customer data and improve their customer experience.
Shopify has built-in form support but it's very limited, there are a few scenarios where it may not be sufficient for a business's needs. Some examples include:
- Integration with other tools: If you want to integrate your contact forms with other tools or platforms, such as CRM or email marketing software, Shopify's built-in forms may not offer the necessary integration options.
- Advanced features: If you need advanced features like file uploads, CAPTCHAs, or multi-page forms, Shopify's built-in forms may not offer these options.
- Large volume of submissions: If you receive a large volume of form submissions, you may need a more robust solution that can handle the load and offer features like spam protection and automatic responses.
- File uploads: The ability to upload files is an added feature that provides value to your customers and allows your store to gather more relevant information from them.
That’s why many Shopify businesses use Formcarry to process their form data. We offer a simple way to add a custom contact form to your website and process the data through our servers instead of through Shopify. With Formcarry you can automatically receive email notifications for each new submission, set auto-responder messages for the sender, and have built-in spam protection for your forms. You can sign up for a completely free account at formcarry.com.
Step 1 - Create your first form
Sign up to formcarry here. Once you’ve logged in to your dashboard, click on the “Create Form” button to create a new form. After creating your form click on the “Setup” button and save your unique endpoint URL which we are going to use later
Step 2 - Change your form code on your Shopify Store
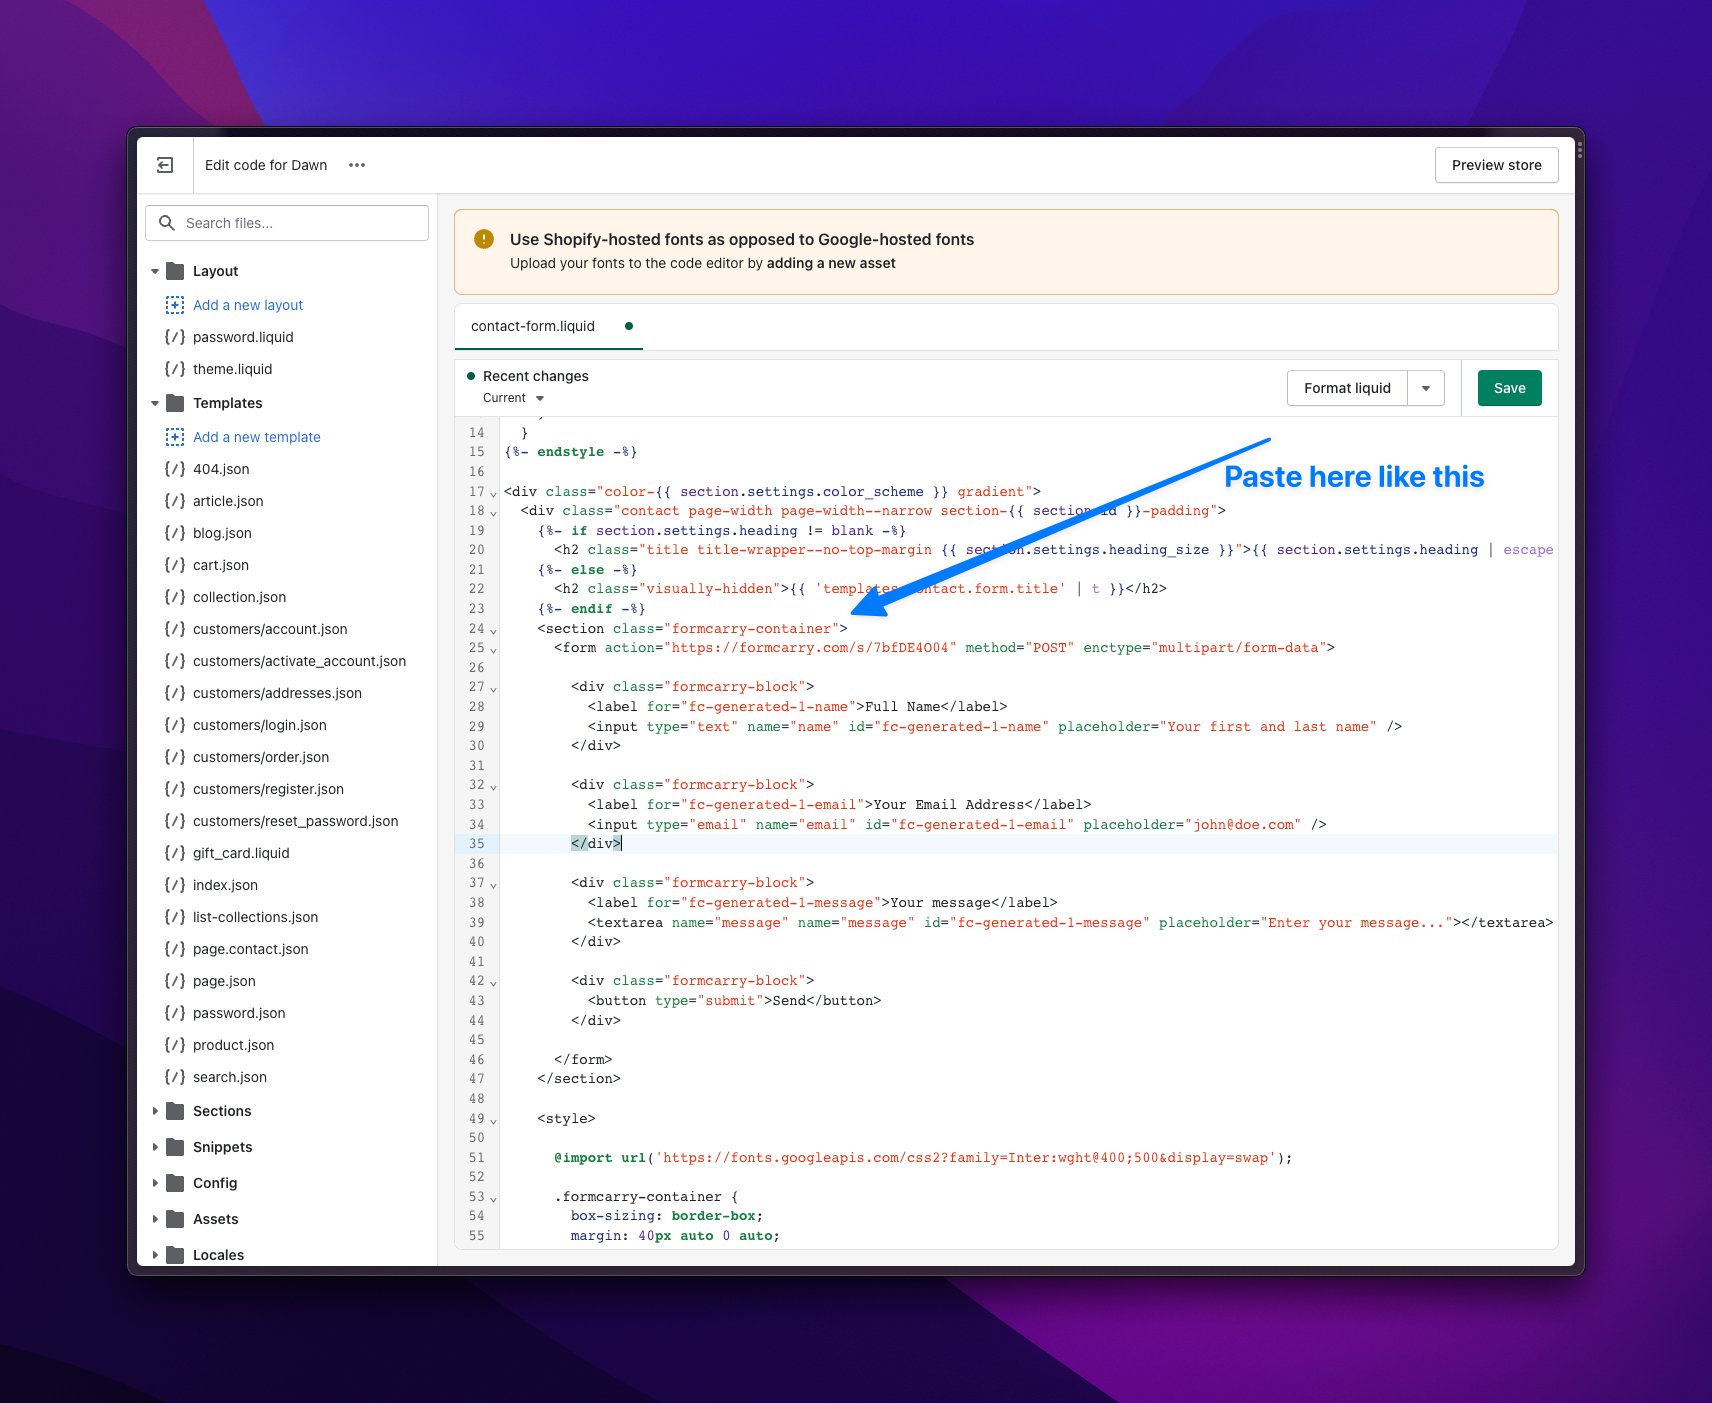
Navigate to your Shopify Admin, click to Online Store from the sidebar, then navigate to the Themes and click the "Customize" button of your current theme. Go into the Edit Code mode then search for "form" and go into the contact-form.liquid, the name may vary in your theme. Open the find panel with CMD+F or CTRL+F and search for the following: "{%-form" once you find it, we're ready to build your form.
Now you have two options to continue:
- Modify existing form code
- Add your own form code
Option 1 - Modify existing form code
Now we are going to override the default form processing URL with formcarry, to do that you are going to need your unique form endpoint URL that you grab in Step 1.
Setting up form action:
Find the following:
{%- form 'contact', id: 'ContactForm', class: 'isolate' -%}And add action attribute with your unique endpoint URL like this:
{%- form 'contact', action: 'PASTE THE URL THAT YOU GOT IN STEP 1', id: 'ContactForm', class: 'isolate' -%}Make sure that you’ve replaced PASTE THE URL THAT YOU GOT IN STEP 1, it should look like https://formcarry.com/s/XXXXXXX, if you don’t replace that your form won’t work.
Setting up field names:
Now we need to give name to each field of your form, otherwise you’ll lose the data of the field.
What you need is find every form field that has name attribute like this:
<input name="contact[{{ 'templates.contact.form.name' | t }}]" ...And change the value between “” by giving your desired name so if the field is collecting legal name, just name it legalName:
<input name="legalName" ...Your form might not have the all possible fields but, here are the full list of possible fields that you have to name:
- Input
- Select
- Textarea
This part will require you to have basic HTML knowledge, but it's not difficult if you take a look around this awesome MDN document. It shouldn't take you more than 2 minutes. If you want a more quick solution, you can use option 2, which is just copy/paste.
Option 2 - Add your own form code
If your store does not have a pre-made form, you can use our free contact form code generator, which will give you a fully working contact form code without needing any further modifications.
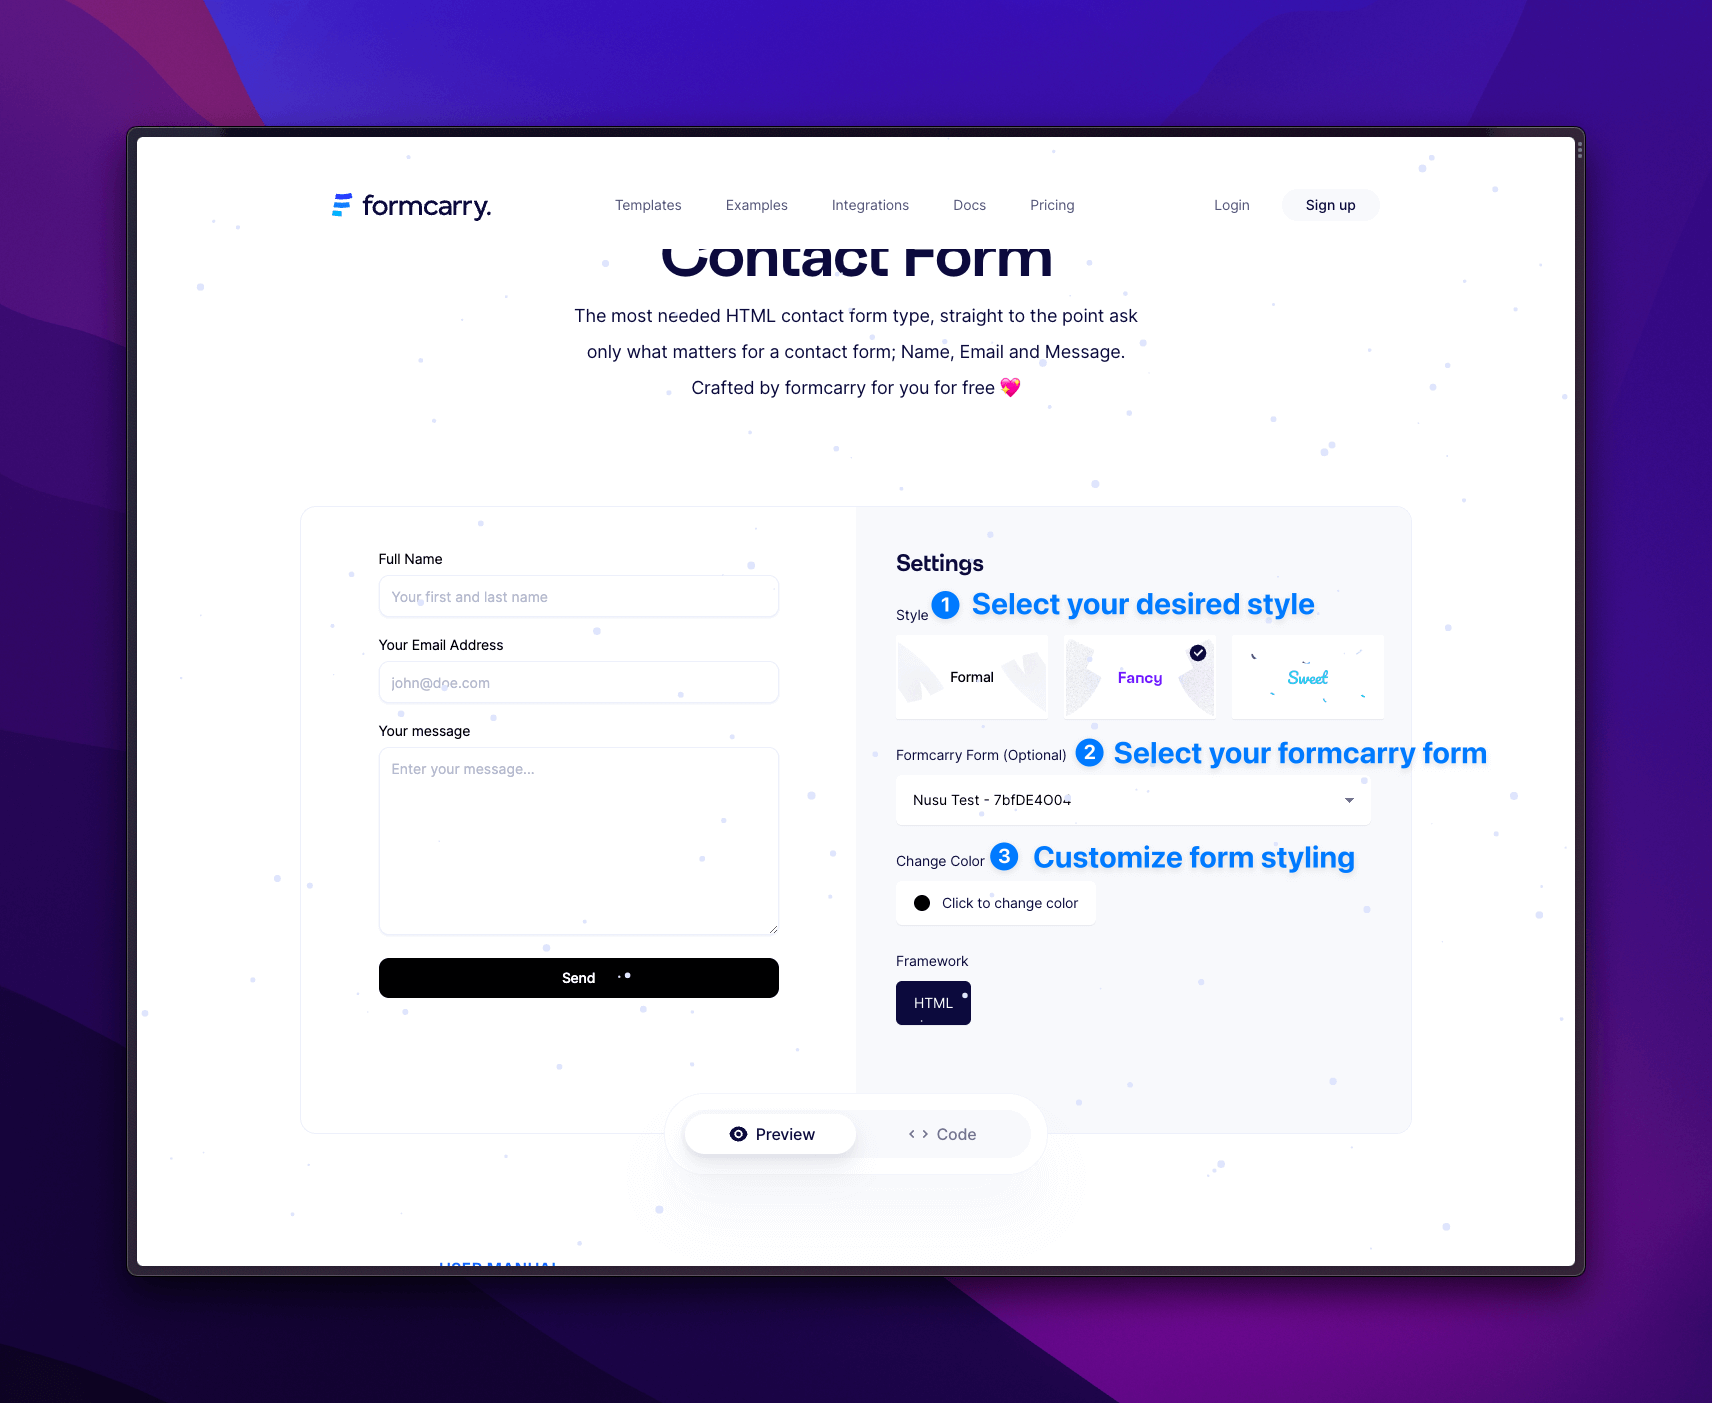
After you customized your form, click the code and copy your fully working code.
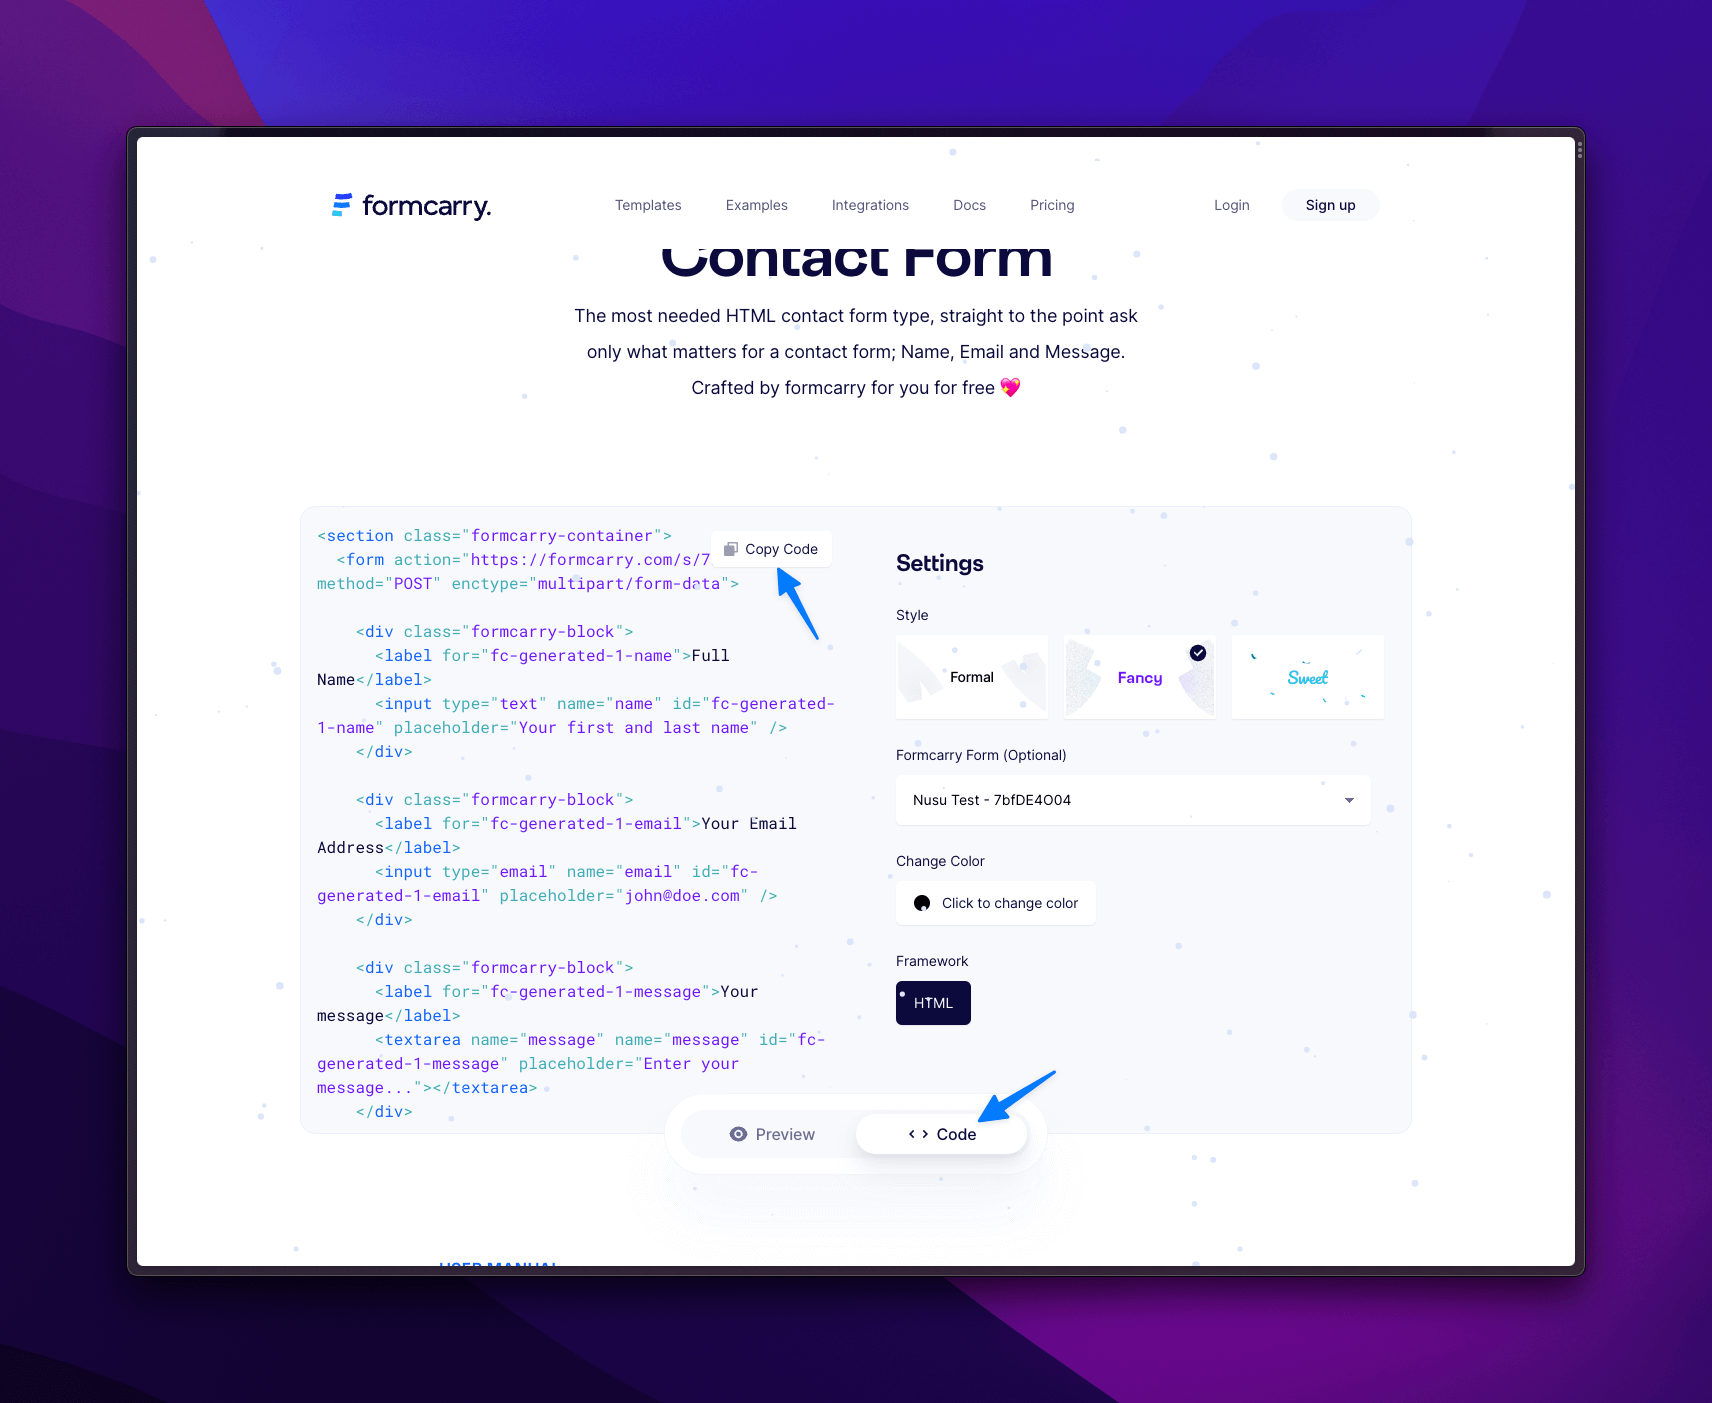
Now paste your code inside the page you want:
Hooray 🎉 Now you have a working contact form!
It’s time to add some magic to it.
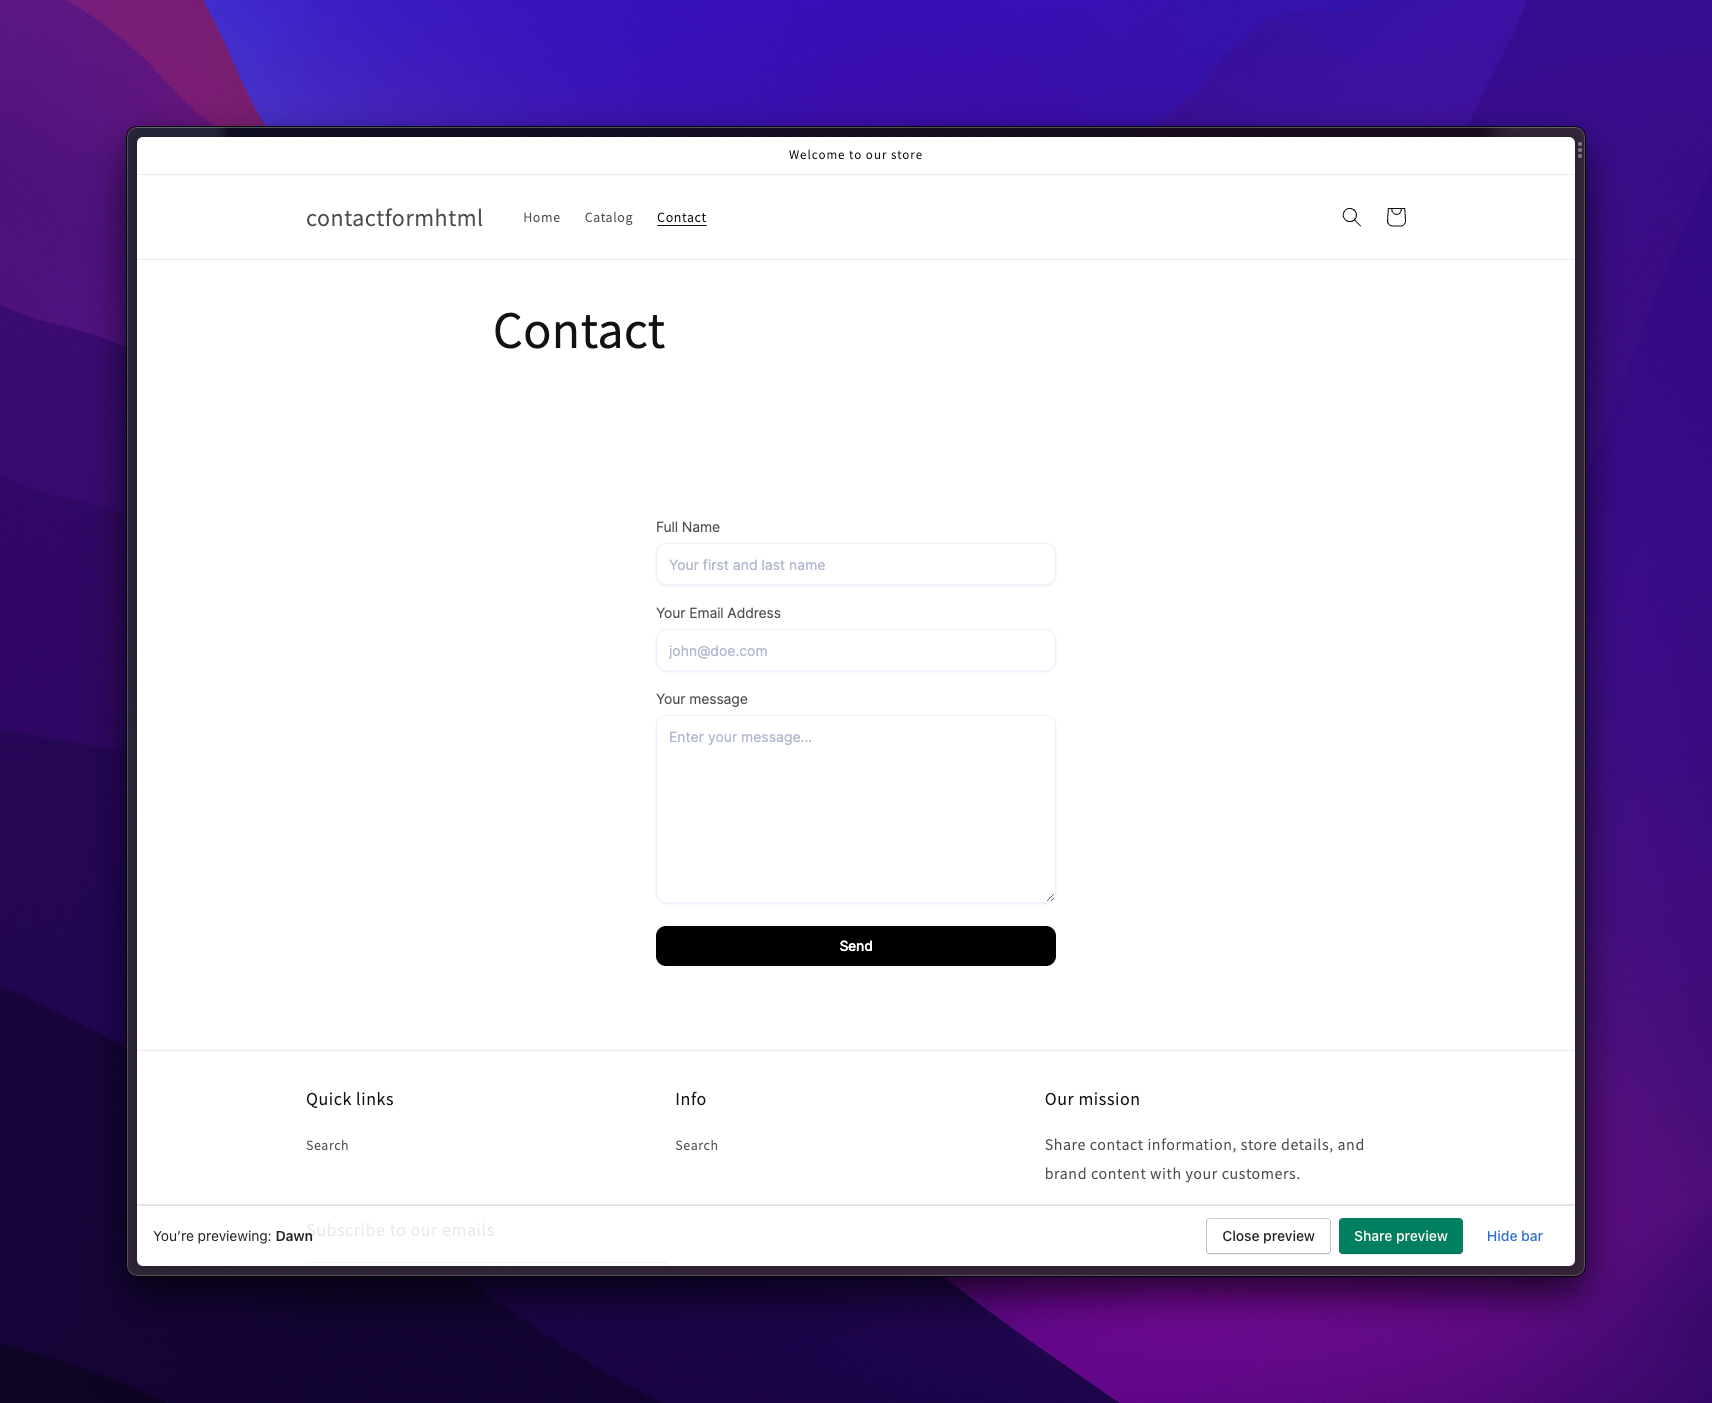
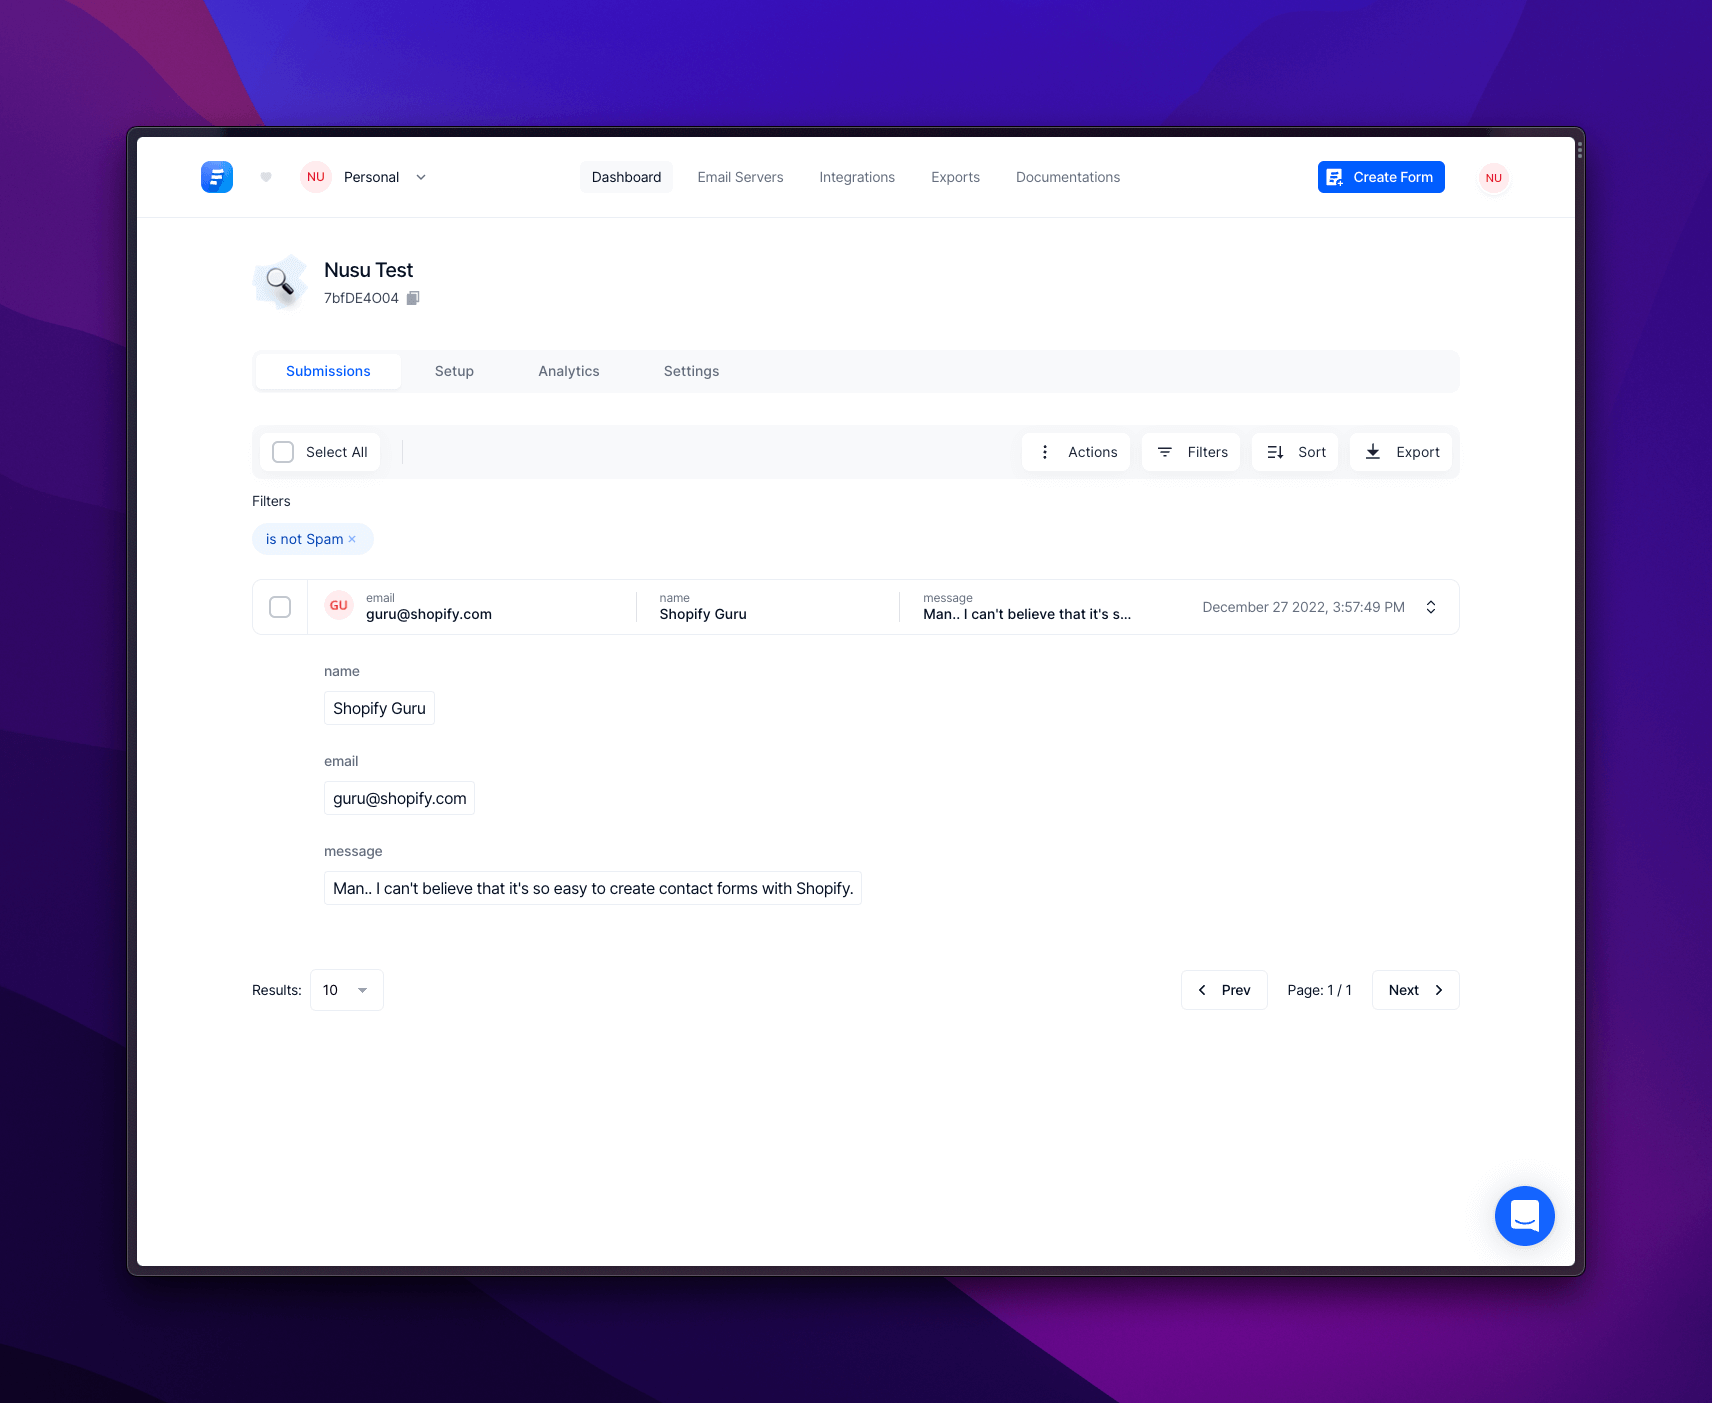
Step 3 - Testing out your form
Just fill out your form with real data to test it (because formcarry has built-in spam filtering), you’ll see that your forms is coming into the formcarry dashboard:
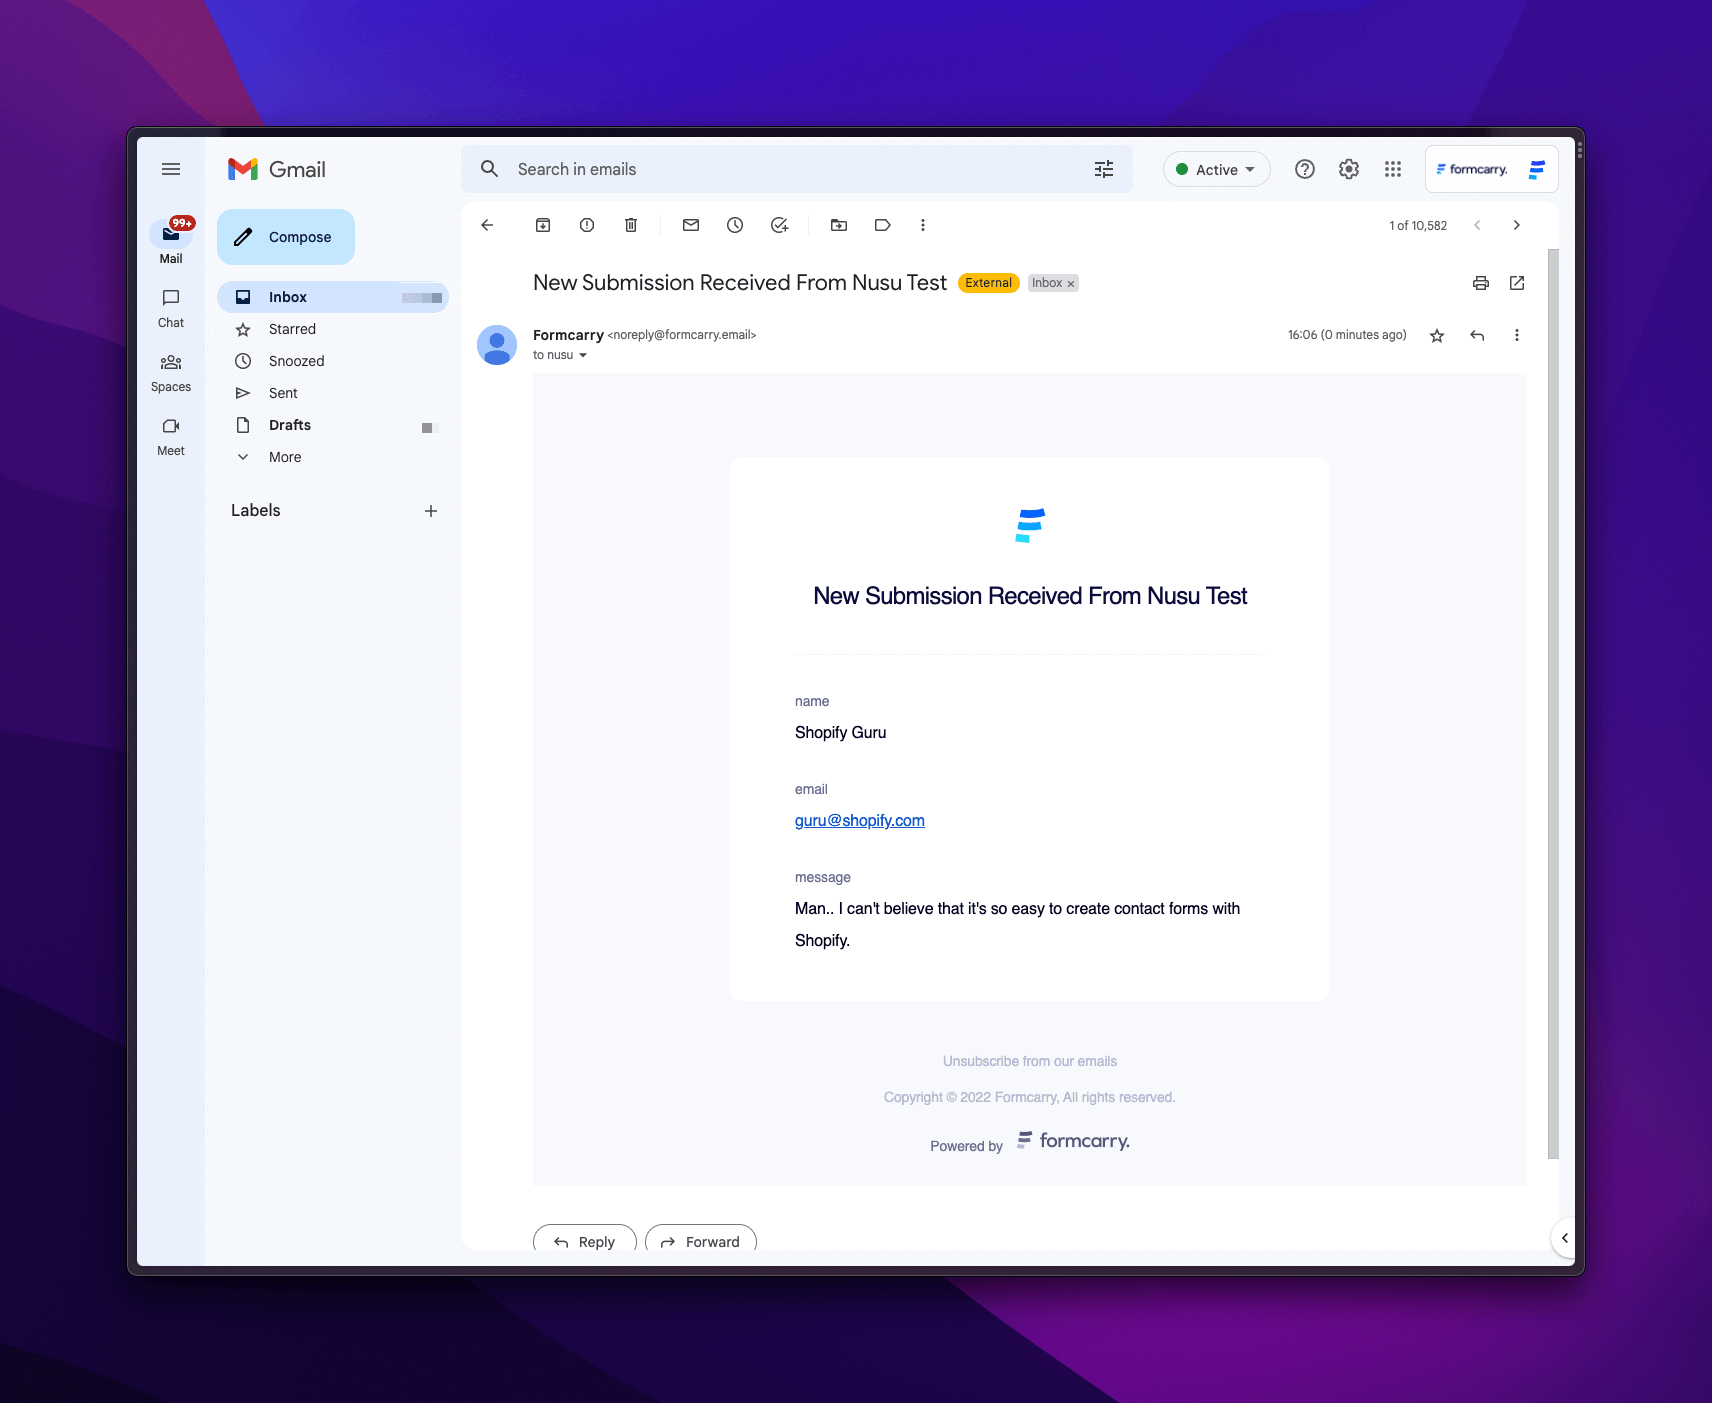
Step 4 - Setting up email notifications for your form
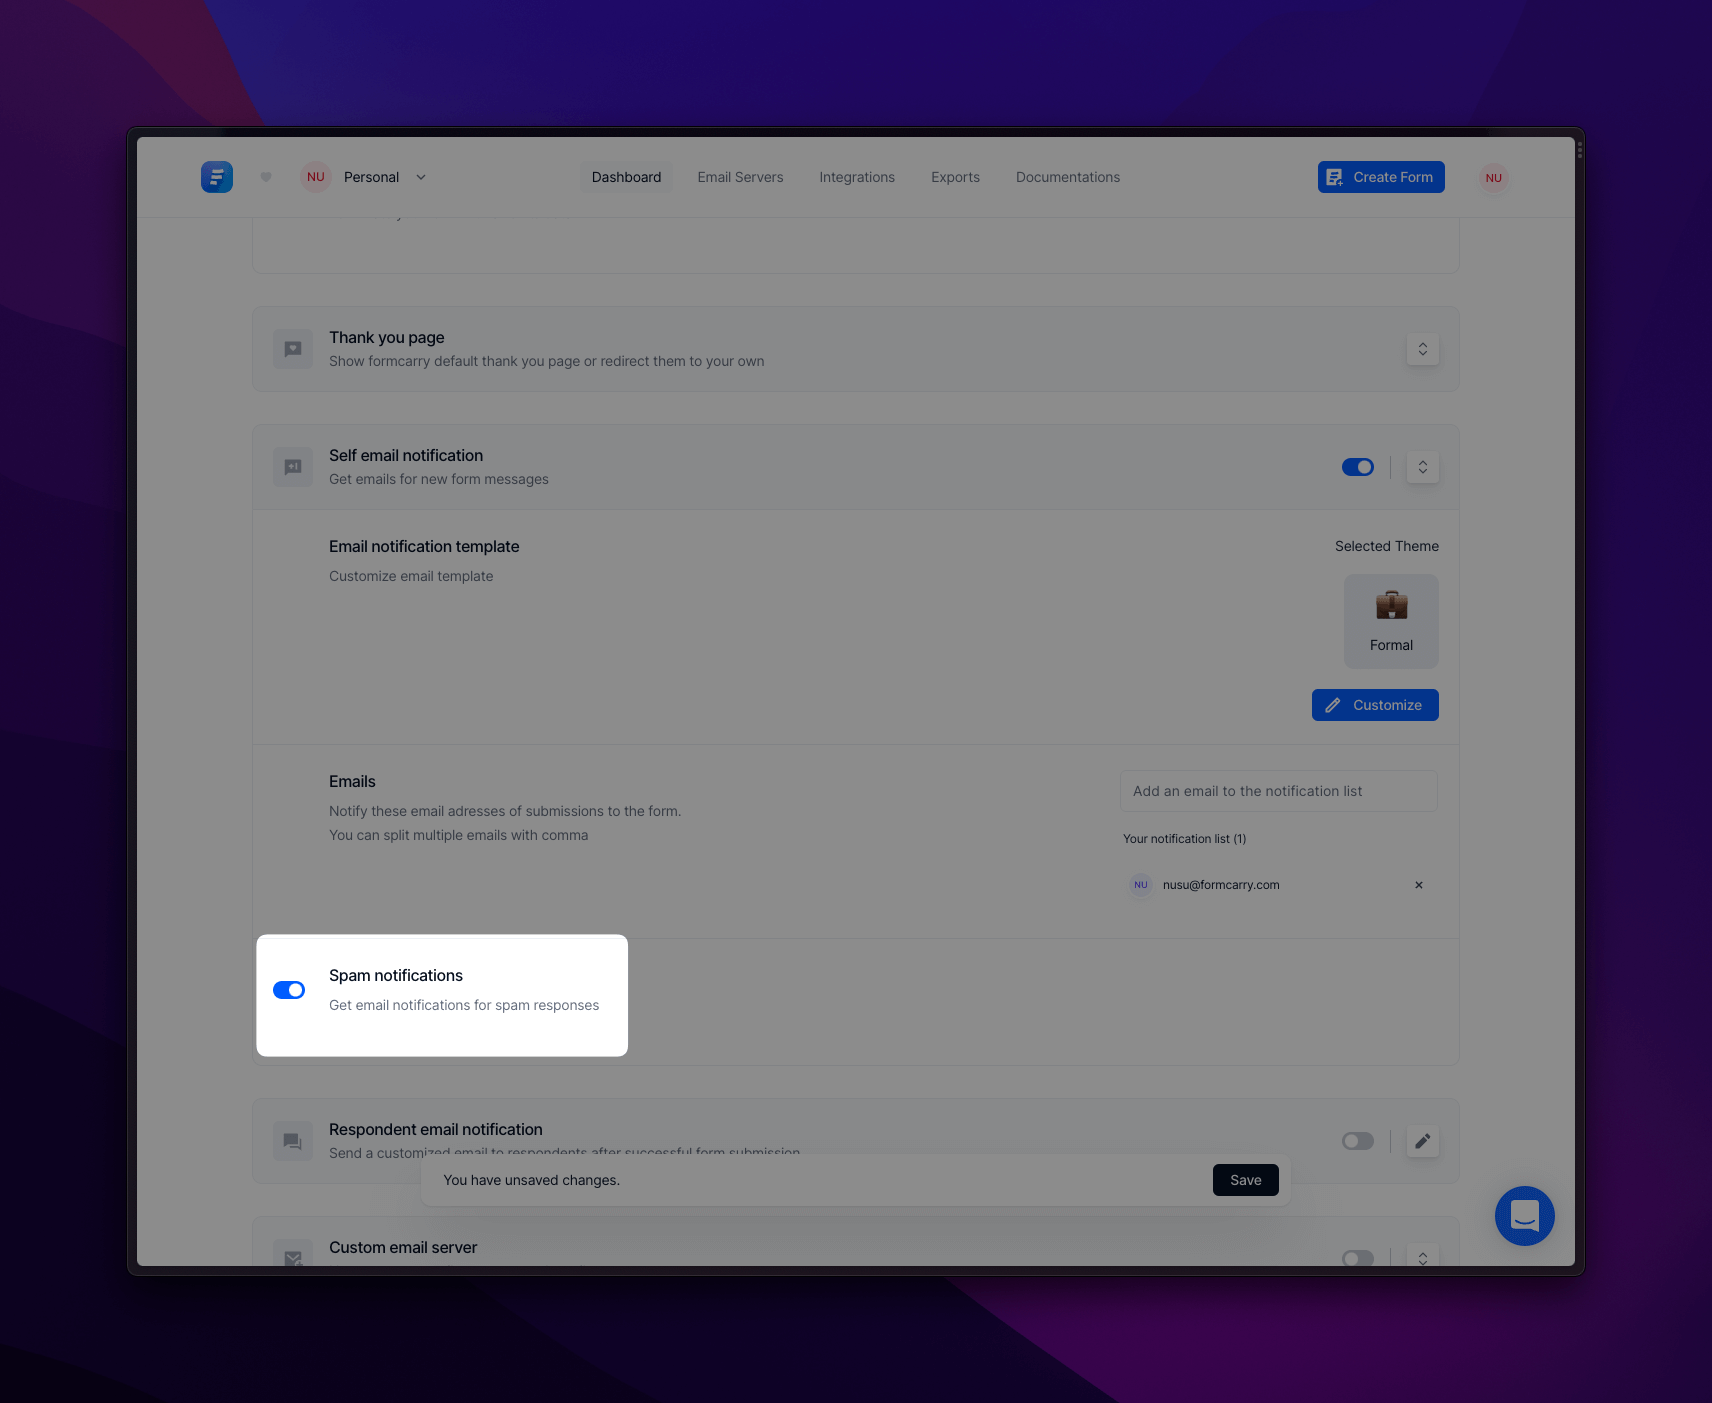
We have a beautiful working form but it’s not enough, let’s add some spice to it, to set-up email notifications you’ll have to go to Settings page inside your form, scroll down to the Self email notification, activate the integration, collapse down and add your desired emails to the notification list, like below:
Once you completed, submit your form again and you’ll get the email notification instantly:
If you don’t got the email, it’s possible that you filled out a test data and formcarry identified it as a spam, By default we don’t send you email notifications if we mark a submission as spam to keep your inbox safe and sound. However, if you wish to disable this feature, you can do so by following the instructions in the screenshot provided below.
Step 5 - Setting up auto response emails
In most cases, the contact forms don't work and users don't get any response, so the best solution is to set up an auto-response email to let them know you have received their message and will reply to them shortly. Luckily it’s really easy to set-up auto-responses with Formcarry.
To be able to set auto-responses the field that you collect user email must be named as “email” if you have used one of our templates then you don’t need to worry about that, but if you have your own HTML form, then make sure that you modify it before setting-up this feature.
To setup, get into your form and navigate to your Settings, then scroll down to Respondent Email Notification, and enable the toggle.
After that click the pen icon on the right of the toggle and customize your template:

Formcarry provides dynamic tags that can be embedded in your email templates. These tags can automatically populate the recipient's name and other details in the form. You can use those to send more personalized messages.
Once you are done with your template click save and now your form is ready to send auto-responses.
Going further
After covering all of these basics, it’s also worth to mention that formcarry is an official Zapier partner
Zapier is a tool for primarily non-technical users to connect together web apps. An integration between two apps is called a Zap. A Zap is made up of a Trigger and one or more Actions or Searches. Whenever the trigger happens in one app, Zapier will automatically perform the actions or searches in another app in order.
Which means you can create complex marketing integrations with Formcarry using your form data, which is really powerful.
Some ideas for you to automate your form:
- Send data to Google Sheets every time a submission is received
- Automatically export submissions to your CRM after each form is submitted
- Create Google Calendar events for new leads or customers captured by your forms
- Create Mailchimp campaigns for new leads or customers captured by your forms
- Create Zendesk tickets to capture form data as a new ticket
- Get SMS notifications when you get a new submissions using Twilio
For more information about Zapier, I highly suggest watching this video.
Conclusion
Thank you for taking your time to read this article, I hope it will help you set up your contact form on your website.